|
Elements Of Good Pesticide Storage
DR. RIC BESSIN
LEXINGTON, KY.
With the outdoor growing season winding done, applicators are storing pesticides until next year. Storing these pesticides properly helps to protect your investment and protect other persons and environment. Because the amount of pesticides stored varies considerably from farm to farm, the look of pesticide storage areas may appear very different. However, the basic elements used to store pesticides are universal. This article highlights the basics elements of good pesticide storage.
Store pesticides in their original containers. Do not transfer pesticides to other containers. Take care to make sure the labels on containers remain intact and legible. Dry formulated materials that have been opened can be placed into sealable plastic bags so they don’t absorb moisture from the air. Check to make sure caps on liquid containers are securely closed.
• Store pesticides in a locked cabinet, room, or building. This prevents children, animals, and untrained people from having access to pesticides.
• Use pesticide-warning signs to alert others. Durable, high-visibility signs are available commercially.
• Keep the area well lit and dry. Water can ruin pesticides, their containers, and labelling. Do not store pesticides in areas prone to flooding. A well-lit area will help to reduce accidents.
• Keep area uncluttered. This reduces tripping hazards when working with pesticides.
• Storage area with an impervious floor. The area should be self-contained with no drains leading out of the area. Larger storage areas with more than 300 gallons of liquid pesticides are considered commercial facilities and need to have a curb around the floor that can contain a minimum of 110 percent of the volume of the largest container in storage. In these larger facilities, a sump will collect spills and pump them into a storage tank.
• Keep the storage area well ventilated. Without proper ventilation, pesticide storage areas will collect volatiles from opened containers.
• Have materials on hand to clean up spills and leaks. Spills and leaks will happen, so plan on them! Absorbent materials like kitty litter, sawdust, or sweep compound are used to clean up the spill. Use the 3 C’s to manage spills; Control, Contained, then Cleanup. Control means to stop the leak at the source. For example if a container has a leak on the bottom, invert he container to stop the leak. Contain means to limit the spread of materials that have leaked by surrounding the spill with absorbent material. The final step is to clean up the spill. Be sure to use all necessary personal protective equipment as listed on the pesticide label.
• Have single-use towels, soap, eye-wash supplies, and change of clothes available. While larger facilities may have an eye-wash station, smaller storage areas may have bottles of eye wash solution.
• Keep an inventory of pesticides in storage. This will help you better manage your pesticides.
•Place smaller containers in plastic totes. While not required, using totes this way will limit pesticide spread if a container leaks.
• Review the storage requirements of each of the pesticides in storage. This information is near the end of the label. Each pesticide may have a different temperature range for storage. Explosion-proof heaters are used to maintain liquid pesticides during the winter. ∆
DR. RIC BESSIN: Extension Entomologist, University of Kentucky
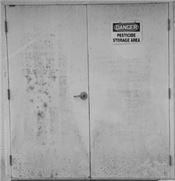
Figure 1. Pesticides are stored in a locked area with easy to read warning signs
Photo: Ric Bessin,UK
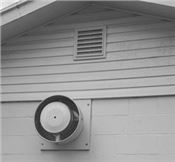
Figure 2. Proper ventilation reduces pesticide exposure
Photo: Ric Bessin,UK
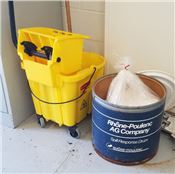
Figure 3. Have the spill kit readily available
Photo: Ric Bessin,UK
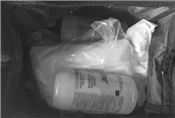
Figure 4. A personal cleanup kit will include single-use towels, soap, eye-wash supplies, and a clean change of clothes
Photo: Ric Bessin,UK
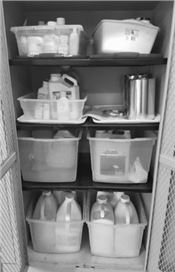
Figure 5. Placing liquid containers into plastic totes is a method to separate herbicides, fungicides, and insecticides
Photo: Ric Bessin,UK
|
|